Hello crafty friends,
I am beyond thrilled to share my final assignment for the Altenew Educator Certification Program (AECP) Level 3! This creative journey has been nothing short of incredible—filled with growth, learning, and self-discovery. Over the past year, each class has not only expanded my skills in cardmaking and papercrafting but has also taught me the values of patience, perseverance, and embracing challenges outside my comfort zone.
For this project, I wanted to bring together everything I’ve learned so far and weave in a very personal touch. Inspired by the class “Reimagining Slim Line Cards into Memory Keeping” by Nathalie Desousa and Maryam Perez, I decided to combine my love for crafting with my passion for preserving memories of my little one. Slim line cards have always been a creative challenge for me, but paired with the idea of memory keeping, it felt like the perfect opportunity to create something meaningful, heartfelt, and art-worthy.
Using die-cut florals, stamping, stencils, golden accents, and shimmer, I created not just a card but also a framed keepsake—a precious memento featuring a picture of my son and me. With his second birthday right around the corner, this project has become more than an assignment; it’s a gift of love and memory we can both treasure for years to come.
Let’s dive in and take a closer look at the slim line card I created for this special milestone.
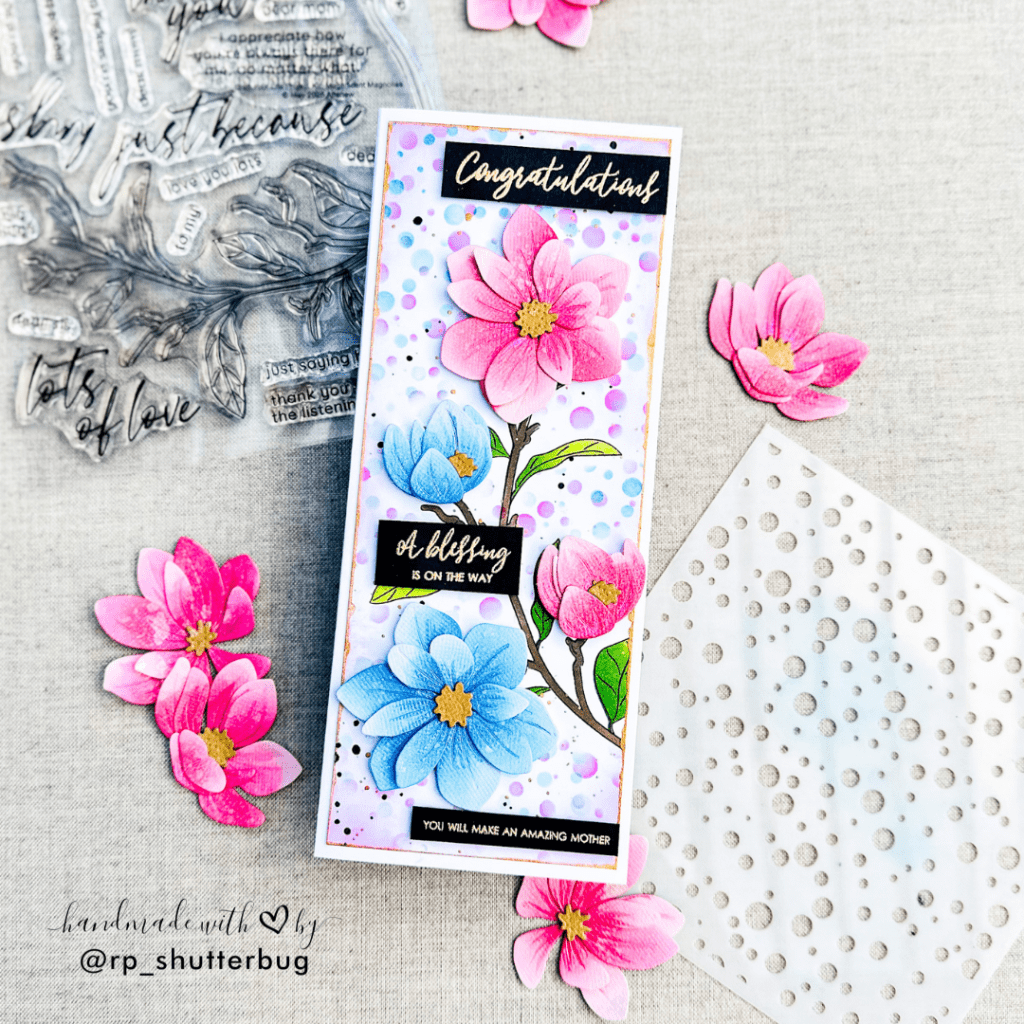
To begin my project, I reached for a sturdy 110lb white cardstock measuring 7″ by 8 ½”. After scoring it down the middle, I created a slimline card base sized at 3 ½” by 8 ½”. Since this was my very first time working with such a large slimline format, starting with the base helped me visualize the space I had to play with.
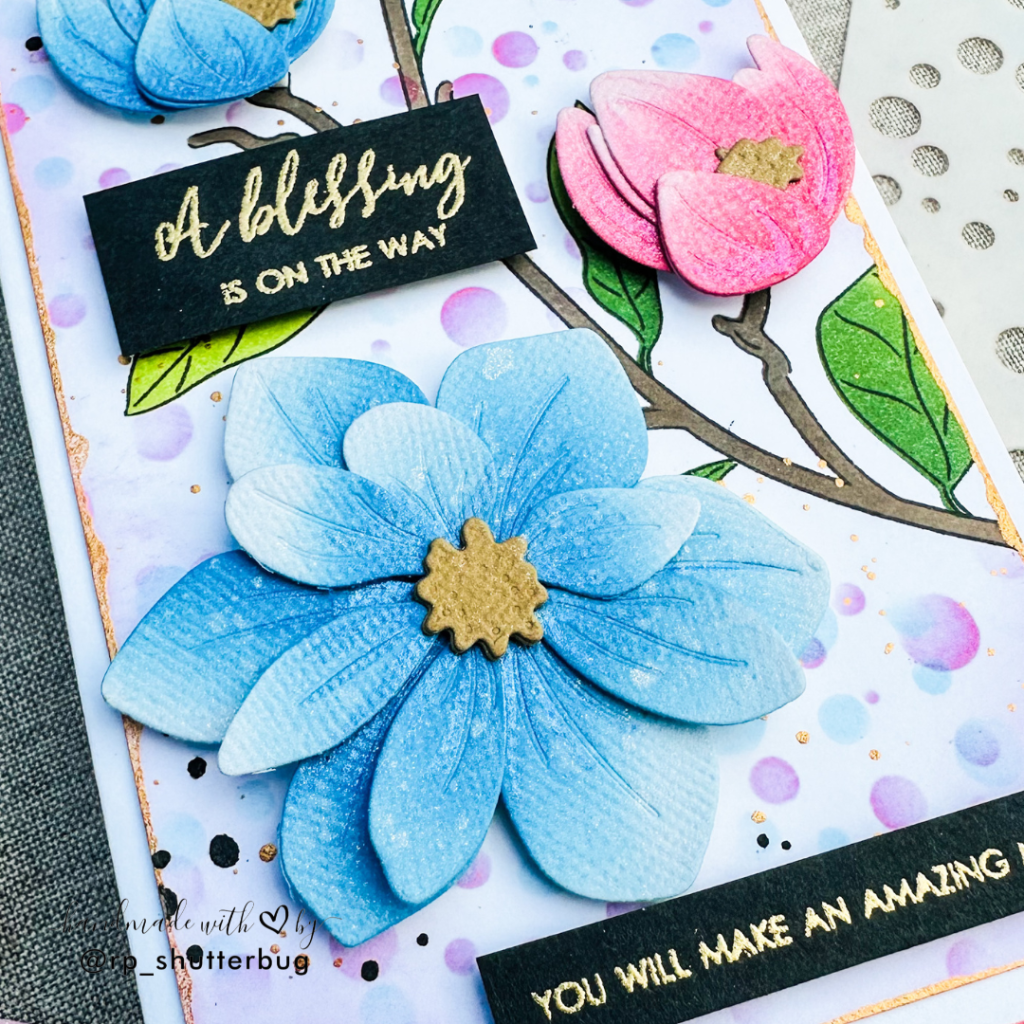
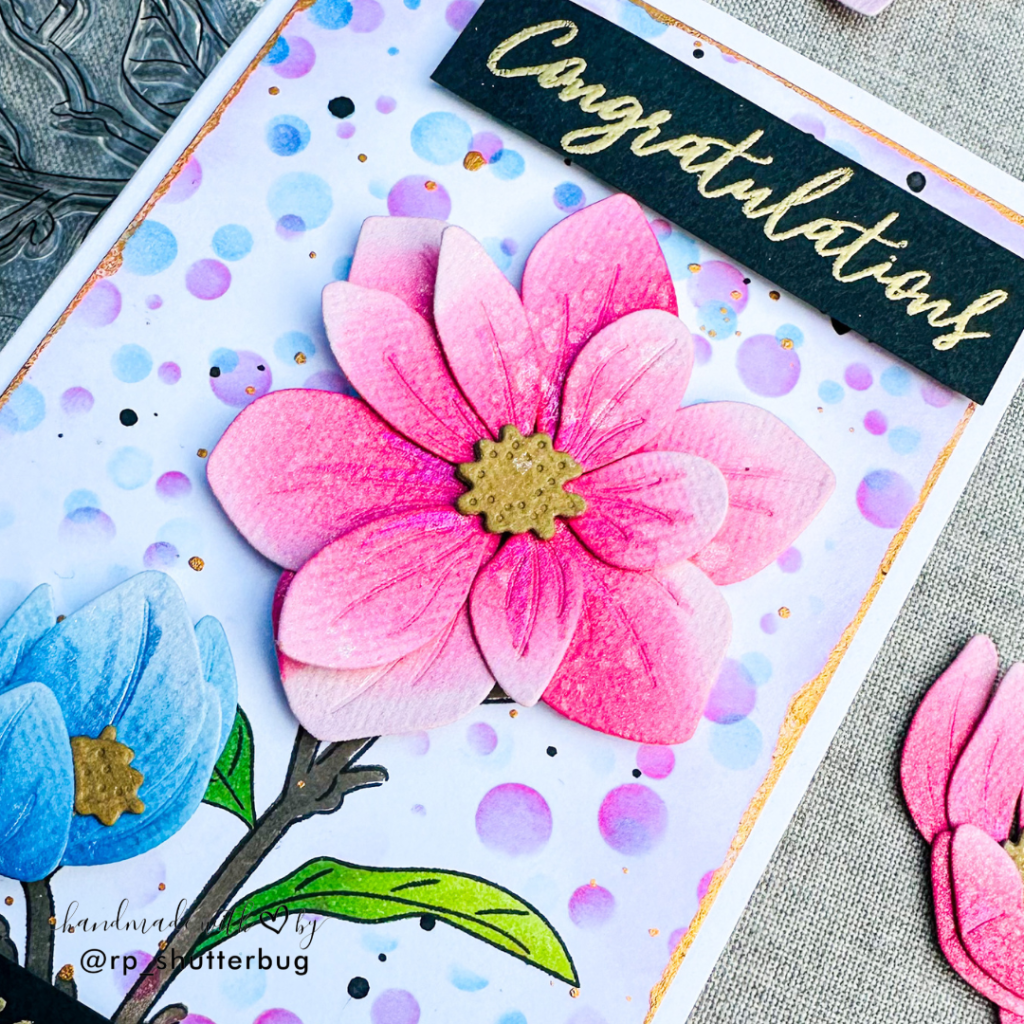
Next, I moved on to my focal point elements. I wanted to incorporate both stamping and intricate die cuts, so I chose the Magnificent Magnolias Bundle—a gorgeous combination of detailed stamped branches and beautifully layered magnolia dies. For the florals, I used soft pastel cardstock in shades of light pink and blue, adding subtle shading before layering the pieces together. What I love most about this set is the keyhole system—it makes assembling the four different magnolias (each illustrated from unique angles) quick and seamless. I die-cut multiple flowers to fill my card front with lush blooms, while also saving a few for the framed keepsake I planned to create later. To give them extra elegance, I spritzed the flowers with a shimmer mist, letting them dry while I worked on the background.
For the card panel, I trimmed a piece of white cardstock to 3″ by 8 ¼”, which would serve as a layered border. I stamped the magnolia branch in Altenew’s Jet Black Dye Ink and debated whether to color it with alcohol markers or use the coordinating stencil from the Craft Your Life Project Kit. In the end, I opted for the stencil and softly blended shades of green and brown to bring the stem to life.
Before adding my flowers, I wanted to give the background a little extra texture and depth. Using the Tiny Bubbles Stencil, I softly blended leftover pink and blue ink from my brushes to add a dreamy wash of color. To finish it off, I flicked black watercolor splatters across the panel for contrast and movement.
Finally, once the shimmered florals had dried, I adhered them to the card front, arranging them gracefully over the stenciled branch. The combination of layered blooms, soft background details, and splattered accents created a card front that felt both elegant and full of life.
Before attaching the panel to my card base, I wanted to add a touch of elegance with gold accents. Using a paintbrush dipped in metallic gold watercolor, I gently brushed along the edges of the panel to create a soft gilded frame.
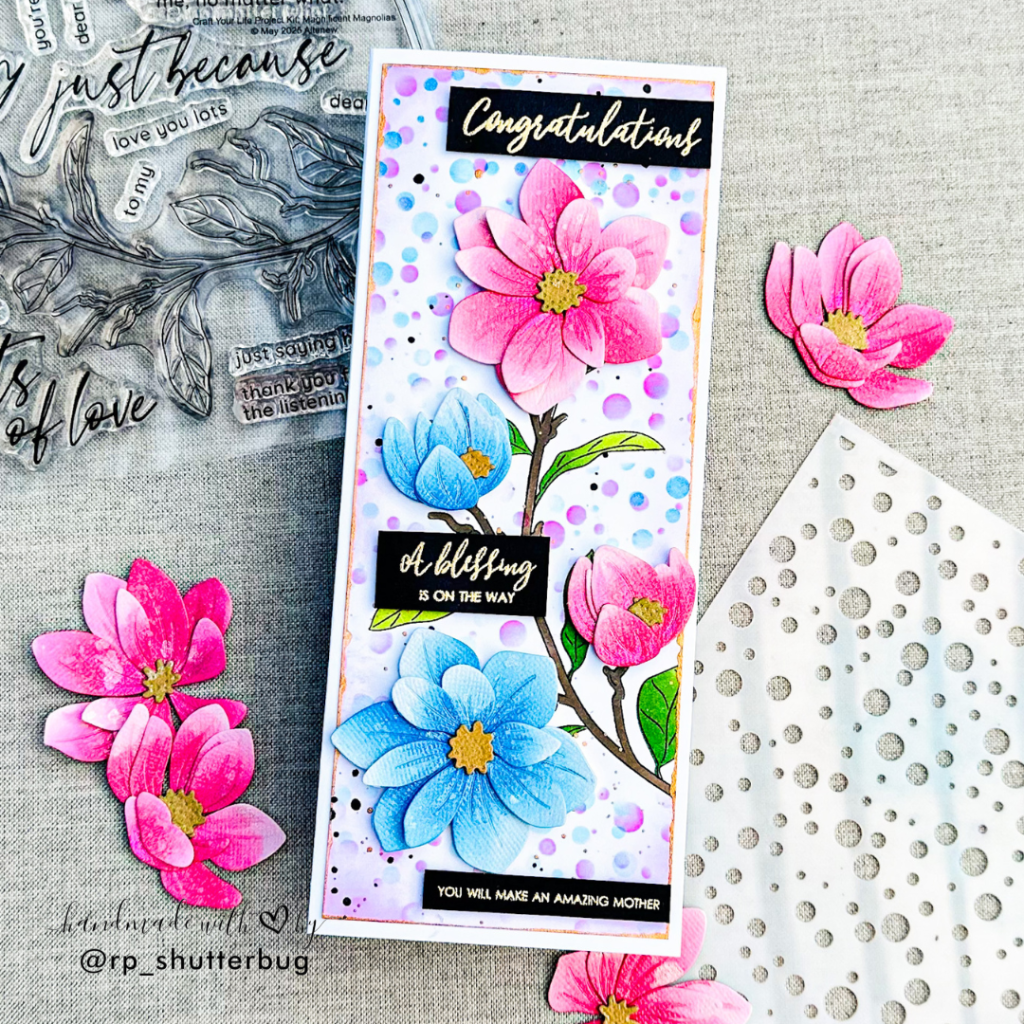
While that was drying, I turned my attention to the sentiments. I selected three heartfelt phrases from the Gift From Heaven Stamp Set and heat-embossed them in gold. To make them stand out, I stamped the sentiments with watermark ink onto black cardstock and then set them with gold embossing powder, creating a bold yet classy finish.
This slimline card truly came together as a blend of elegance and creativity, showcasing delicate florals, soft stenciled details, and a touch of gold for that extra shine. It was such a rewarding experience stepping outside my comfort zone and exploring a new card size, and I love how the final piece turned out—both meaningful and celebratory.
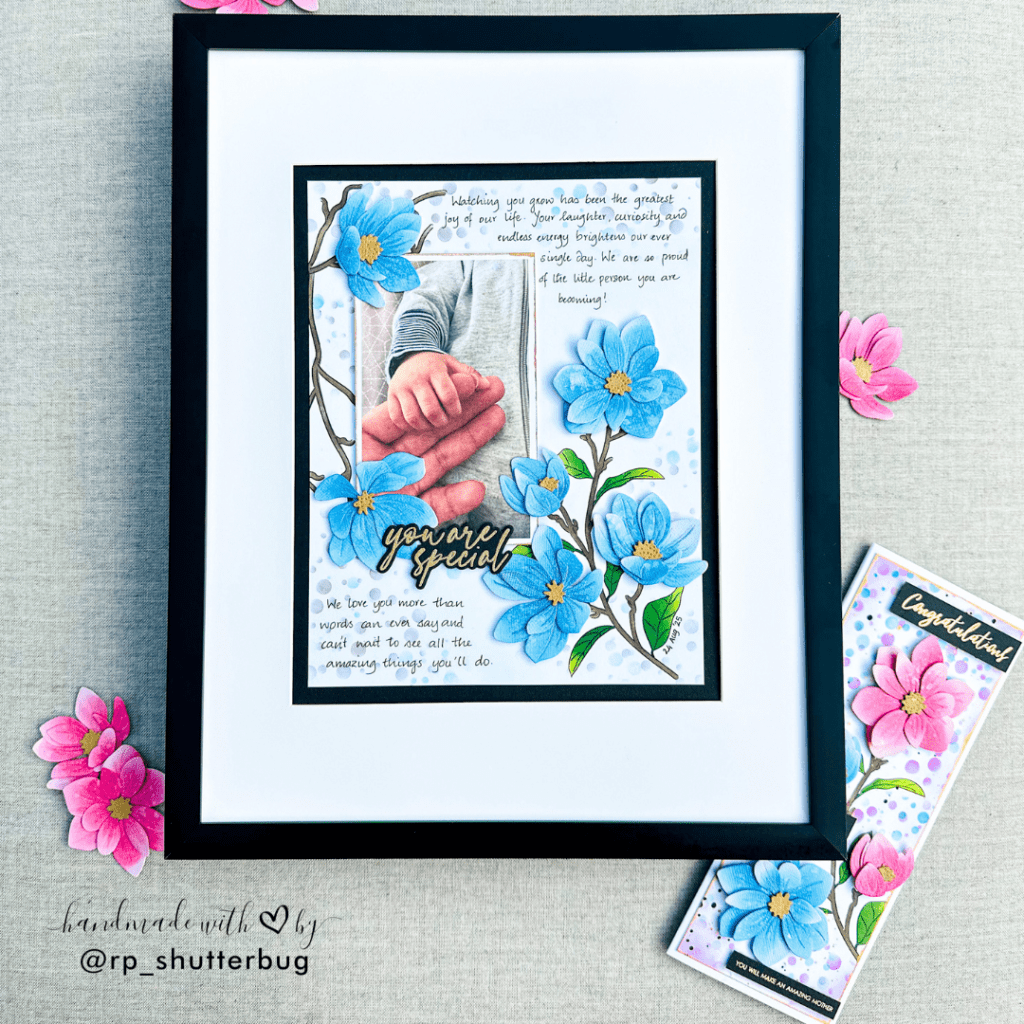
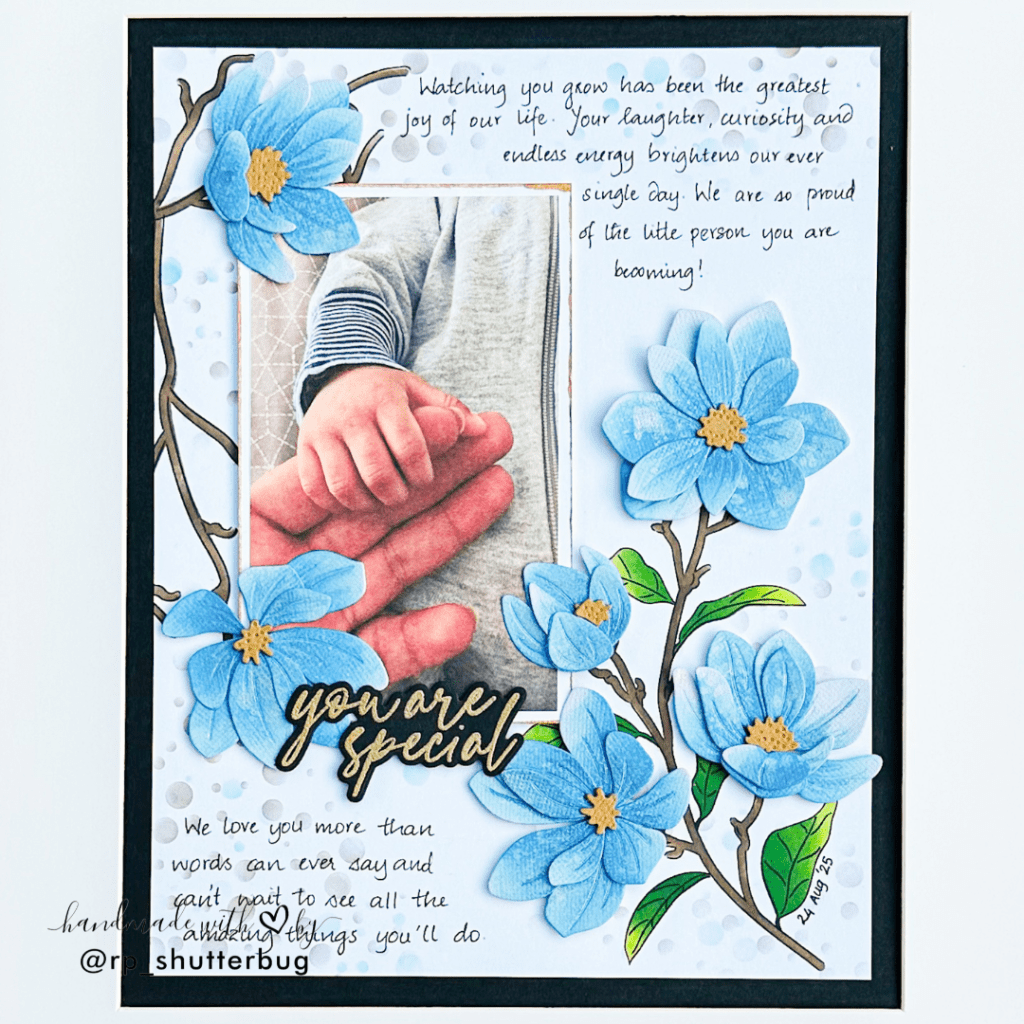
For the second part of this assignment, I wanted to take the design elements from my slimline card and turn them into something even more meaningful—a framed keepsake for my son’s 2nd birthday. Instead of just creating a card, I felt inspired to craft a piece of art that he (and I) could treasure for years to come.
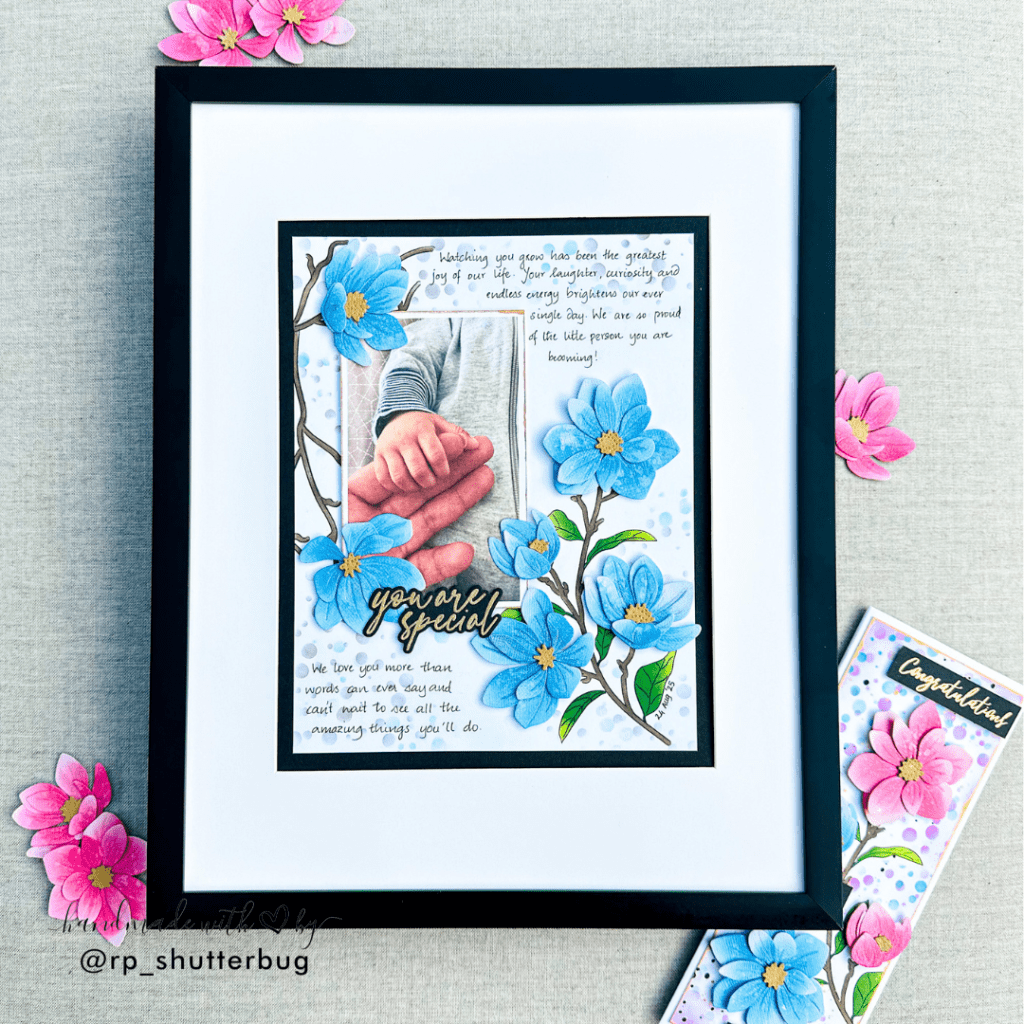
I started with a frame designed to hold an 8″ x 10″ photo and trimmed a piece of cardstock down to 7 ¼” by 9 ¼” so it would sit neatly inside with a balanced border. For the focal point, I printed a deeply heartfelt picture of my little one holding onto my finger—a moment I knew I wanted to capture forever. I had already planned the layout, so I sized the photo to fit perfectly in the top left quadrant of the panel.
Before adhering the picture, I added some stamped details. Using the Magnificent Magnolias branch stamp, I stamped branches on both sides of the panel and brought them to life with ink blending through the coordinating stencils, just as I had done on the card. To tie everything together, I brushed the edges of the photo with gold metallic watercolor, creating a soft gilded frame, before adhering it in place.
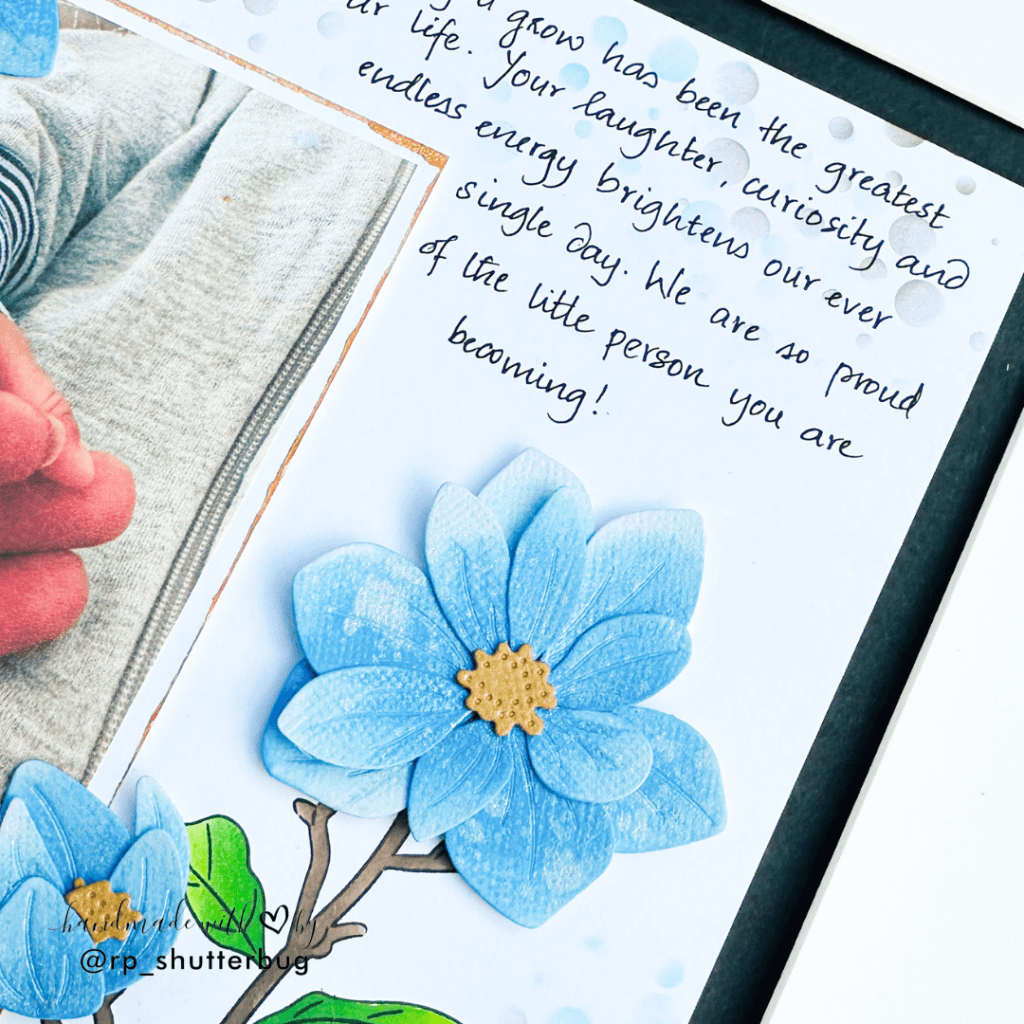
Next came the floral arrangements. I layered the die-cut magnolias across the panel, tucking some slightly over the edges of the photograph for a more organic, seamless look. A few of the flowers were popped up with foam tape for dimension, while others were adhered directly with liquid glue to create depth and variation. For extra background texture, I softly blended through the Tiny Bubbles Stencil, echoing the subtle details from the card.
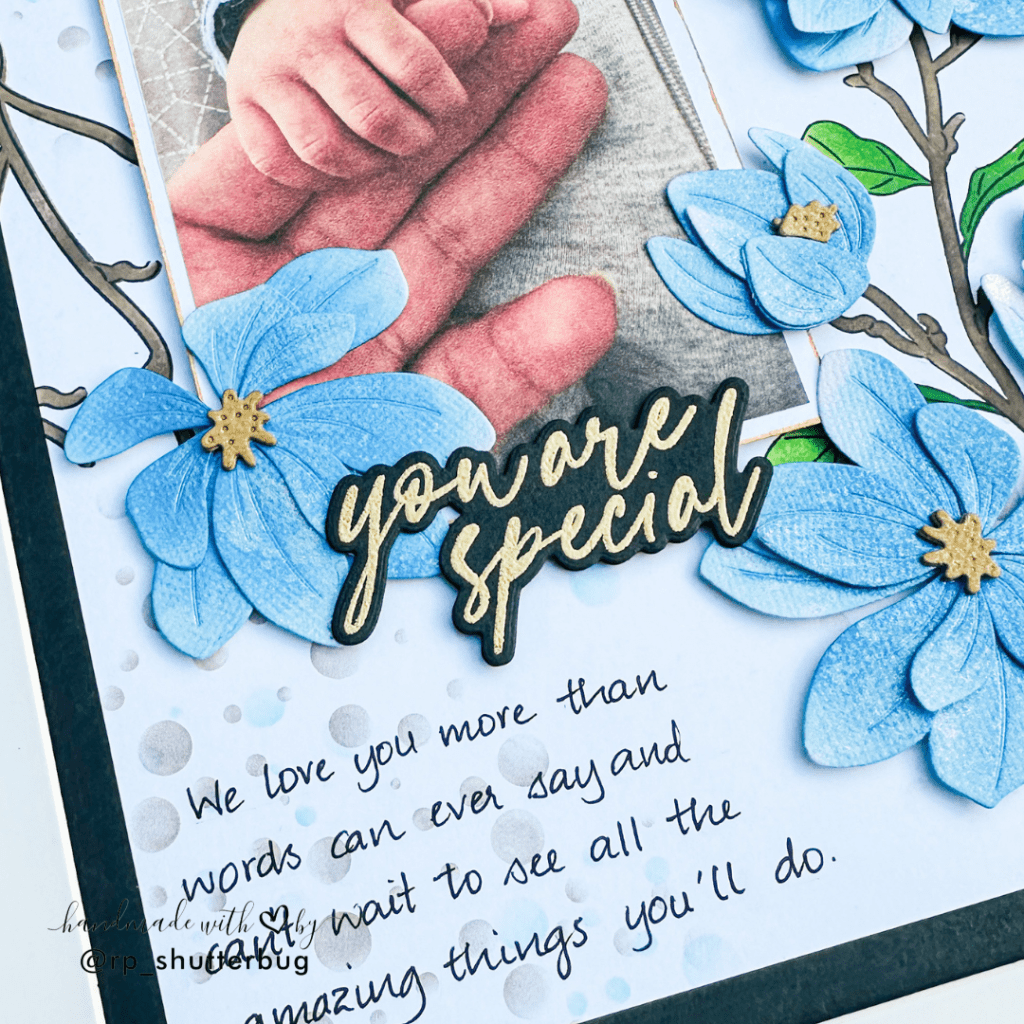
For the sentiment, I chose a phrase that felt absolutely perfect for my son—“You Are Special.” I heat-embossed it in gold on black cardstock, die-cut it, and placed it just beneath the photo as the finishing touch.

Before framing the piece, I couldn’t resist adding a handwritten note in the open spaces of the panel, making it even more personal and heartfelt. This keepsake holds so much love, capturing not just a photograph but also the emotion of that tiny hand wrapped around my finger. I hope my son treasures this memory forever—just as I will.
Creating this project for my AECP Level 3 final assignment has been such a meaningful journey. The slimline card challenged me to step outside my comfort zone, while the framed keepsake allowed me to weave my love for crafting with a deeply personal memory of my little one. Together, they represent everything I’ve learned throughout this program—patience, creativity, and the joy of turning paper and ink into something lasting and heartfelt. This experience has not only helped me grow as an artist but has also given me a keepsake I will treasure forever.
And with that, I wrap up my year-long AECP journey—a journey filled with creativity, growth, and so much joy. Each class and every lesson I took has shaped and refined my current cardmaking style, giving me both confidence and inspiration to keep exploring new ideas. I am truly grateful to the entire Altenew team for creating such a unique opportunity for crafters like me to pursue our passion for papercrafting and cardmaking. Along the way, I’ve also been blessed with wonderful friends, mentors, and a supportive community that made this experience even more special. This chapter of my journey may be complete, but the inspiration I’ve gained will carry forward into everything I create.
The Altenew Educator Certification Program is definitely a best opportunity to showcase my work and get in touch with all of the amazing crafters.

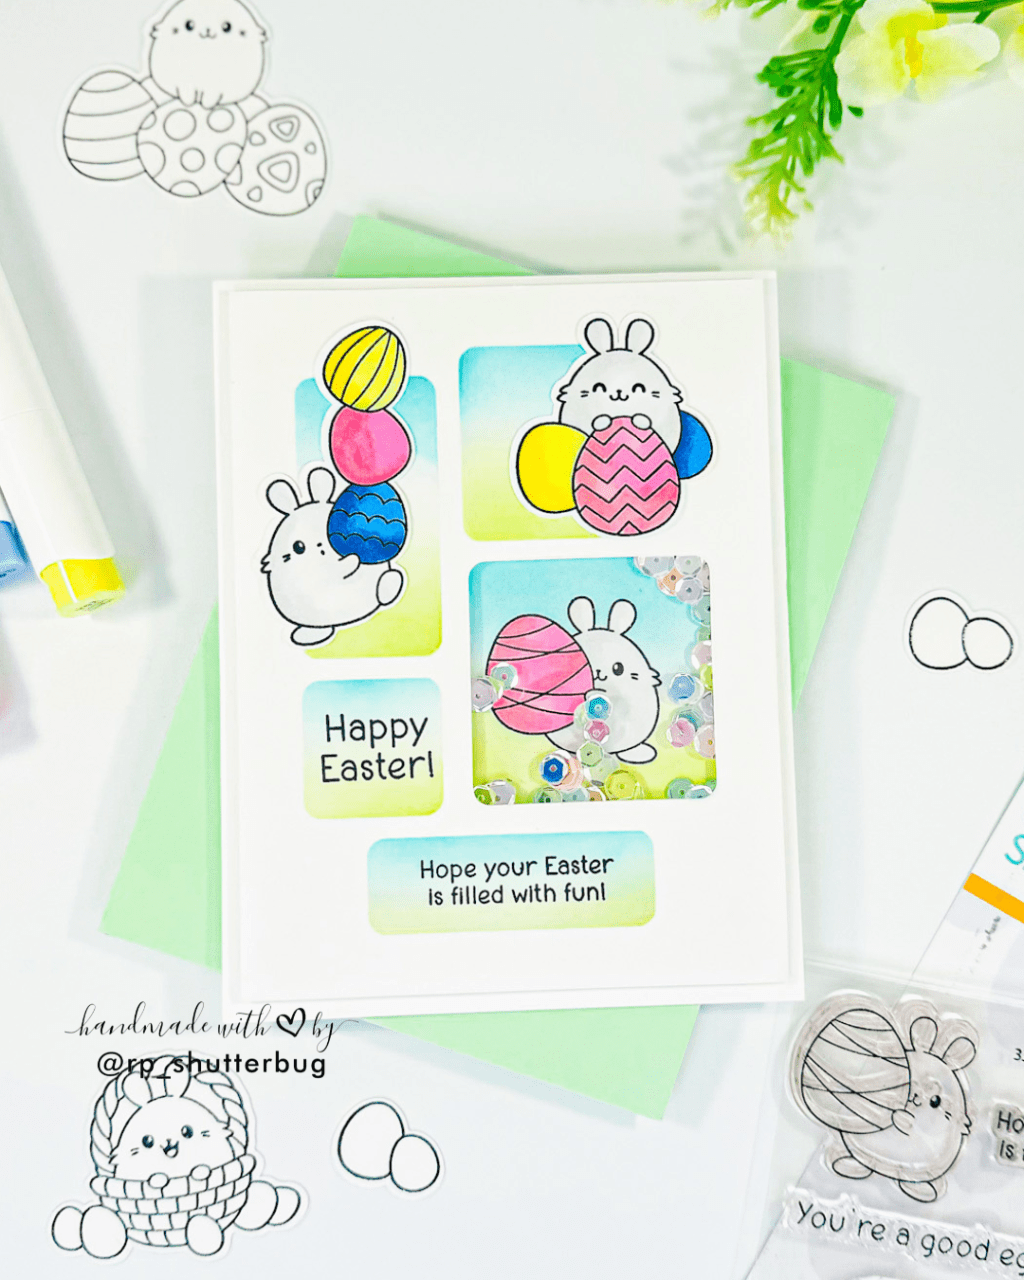
Thank you for being here with me today. Do check out fun pictures and videos of the project on my Instagram page (@rp_shutterbug). Also, tag me on Instagram with pictures of your projects.
SUPPLIES:
*NOTE: Affiliate links may be used (at no additional cost to you) – thank you for your support!
 https://linkdeli.com/widget.js?id=f5e8378456858c916708
Thank you again for joining me today. Until next time, stay safe.


Leave a reply to Erum Tasneem Cancel reply